Created by Historic Deerfield Museum Education Staff Members Claire Carlson and Faith Deering.
Welcome to Week Twelve of Maker Mondays from Historic Deerfield. Check your social media feed or look for an email from us every Monday for a fun activity that you can do at home, inspired by history and using common household items.
Please Note: As we head into summer, our Maker Mondays activities will be posted every 2 weeks through July and August.
Download a printable version of this activity (PDF).
This Monday we will show you how to make shapes and pictures using an historic art form called quilling. First, we will share an example of quilled art from Historic Deerfield’s collection. Next, we will tell you about some of the fascinating and interesting history of quilling prepared by former intern Catie Chipman. Then, you can find some paper, get out your scissors and glue, and follow our directions to make your very own quilled picture!
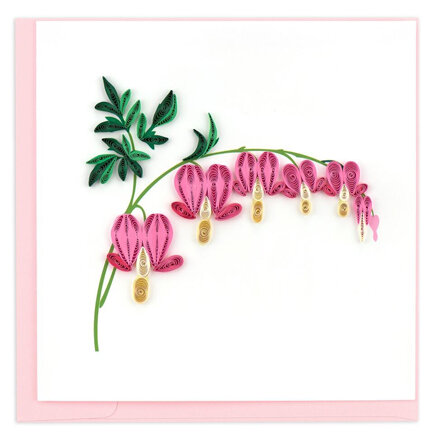
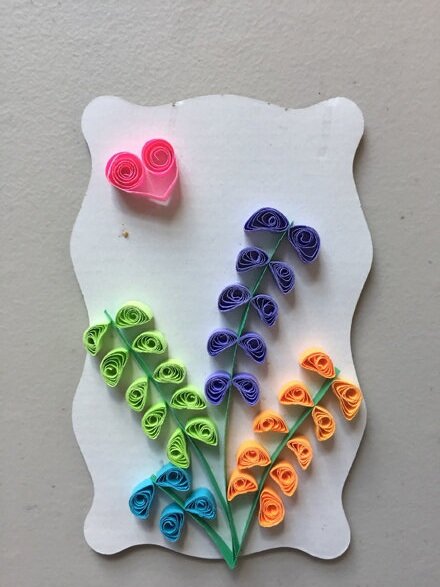
A contemporary greeting card featuring a bleeding heart flower made from quilled paper.
https://www.historic-deerfield.org/stationery?category=Quilling+Cards
HD 57.057.2
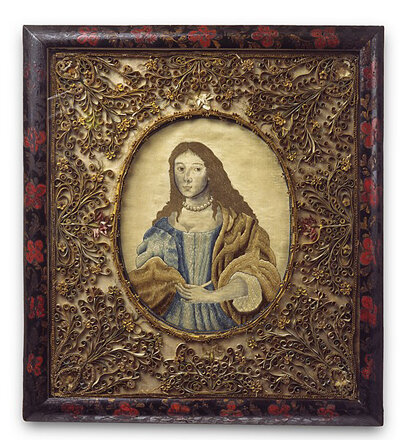
This framed silk embroidered image of a young woman was made in the early eighteenth century. It depicts a woman with long brown hair, with pearls around her neck, and wearing a gown in shades of blue and and brown/gold robe in an oval medallion outlined with blue and gold cord. Her image is surrounded by tiny scrolls of rolled paper known as paper filigree or quillwork. An art form which began in Italian convents in the 13th century, paper quillwork was made from 1/8″ strips of paper and parchment from discarded book pages. Plain paper and parchment coils were assembled to mimic carved ivory, while the gilt edges of other textblocks were trimmed and scrolled to resemble gold wire filigree. Other designs included spirals, rosettes and flutes, which were tightly wound around a thin quill and then glued by one edge to a background of paper, silk, or wood. By the seventeenth century, secular decorative paper filigree had become fashionable in England. Formal instruction, papers, and patterns were marketed for the education of young women in England and the colonies in the early eighteenth century. The japanned frame is from the period and appears original to the piece. Formerly HD 86.800.
The History of Quillwork: Reviving a Lost Art
Written by UMass Intern, Catie Chipman
Quillwork, also known as paper filigree, paper mosaic, or paper lace, is the art of twirling small strips of paper into intricate, coiled designs. An art form with a truly multicultural history, this craft dates back to the invention of paper itself, in China, circa 105 A.D. In the fourth and fifth centuries we see “metal filigree” (decorative coiled metal strips or wires) in its finest form in Byzantine Greece. Prior to this, metal filigree was popular and can even be found on Greek, Egyptian, and Etruscan tombs. However, because it was so expensive, a cheaper alternative was found in paper, a trend that would continue on throughout the centuries. Paper filigree eventually migrated to Europe with other mosaic arts, and in the seventh century is seen frequently used in Italy.
It wasn’t until the mid-seventeenth century that paper filigree really began to be recognized as an art form. In fact, to this day it remains the least well-documented paper art. However, it was found that during this time French and Italian nuns rolled torn edges of Bibles to decorate religious articles and pictures, reviving the practice. “Genteel” women of England then kept filigree alive during the early-to-mid eighteenth century. The art was taught to young women schoolgirls along with needlepoint, and was used to decorate both fireplace screens (as was also done with needlepoint) and even furniture. More popularly, though, was its use in making framed coat-of-arms and shadowbox models of houses, both of which can be found in Historic Deerfield’s collection. The patterns for such work were published in women’s journals such as The New Lady Magazine (1786-1787), which would help the art travel to the Americas.
Toward the end of the nineteenth century, the art of paper filigree waned in Europe, but experienced another revival when brought to the Americas. Here it is said the name “quillwork” began being used in reference to the use of goose feathers, or quills, to roll the paper.
Ninety percent of the preserved examples of quillwork remaining today was made by women. These examples are typically in the form of sconces and shadow box frames in the United States, although there are also examples of English inspired coats of arms, house models, and portraits of Queen Anne, such as those in Historic Deerfield, that made their way from Europe. Had it not been for the art of schoolgirls, these specimens may have been even more rare, if not entirely missing from the more modern period.
The art of quilling, once again, had recently seemed to disappear. However, with the modern-day popularity of scrap-booking it may be experiencing yet another renewal. In trying this today, and practicing quillwork yourself, you have become part of this revival, bringing back a lost art form.
Want More Information?
Sources:
Aaron, Elizabeth. Quilling: The Art of Paper Scroll Work. London: B.T. Batsford Limited, 1984.
Christy, Betty and Tracy, Doris. Quilling: Paper Art for Everyone. Chicago: Henry Regnery Company, 1974.
Ritchie, Carson I. A. Art in Paper. New Jersey: A. S. Barnes and Co., Inc. 1976. P.101-125.
Lee, Jaqueline. Twirled Paper: Make Almost Anything with Simple Paper Strips. Klutz Books, 2012.
Step by Step Instructions for Quilling and Making Paper Coils:
First, assemble your materials. You will need a quilling tool, scissors, strips of paper, a toothpick and some white glue.
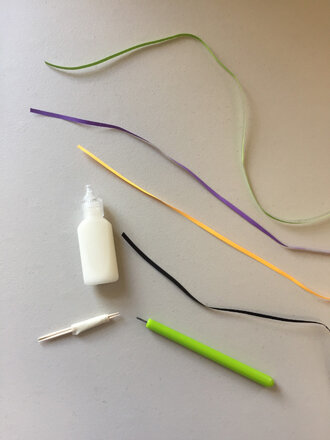
Note: How to create strips of paper: We found that ⅜” and ¼” inch strips work best. You can purchase pre-cut strips in a quilling kit, measure and cut your own, or use a paper shredder to make your strips.
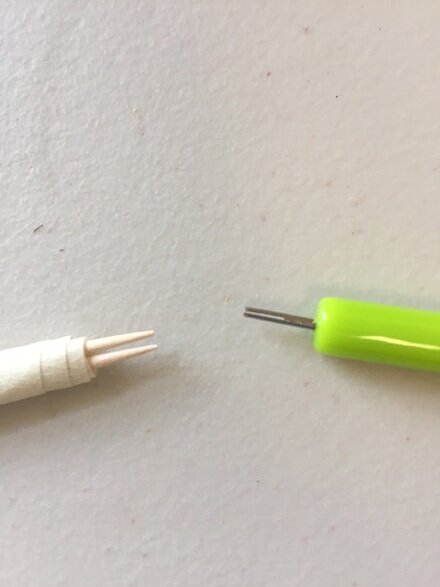
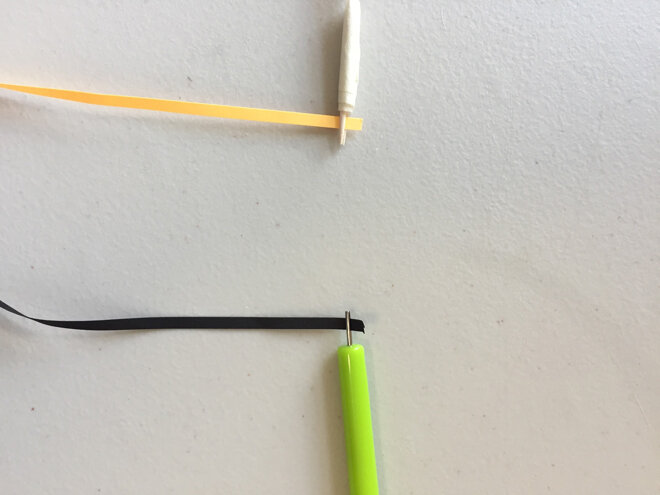
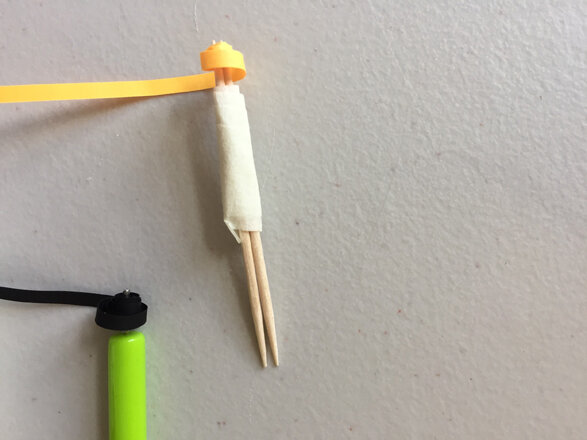
Make a Quilling Tool
A quilling tool helps you to twirl the paper strips into coils. The tip has a small slit into which you insert the tip of the strip and start to twirl the paper. If you don’t have a quilling kit, which comes with a tool, you can make one by taping two toothpicks together, leaving a small slit at the tip.
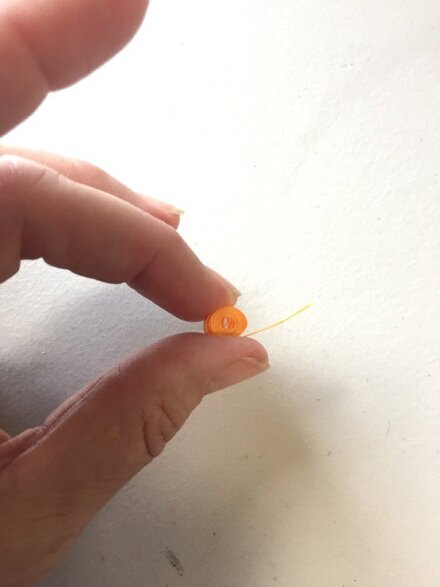
Here are two photos of how to make the coils using the tool. See below the photos for how to make the coils:
● Choose a strip of colored paper
● Slide one end of your strip into the space between the toothpicks ( your quilling tool)
● Spin the quilling tool so that your strip wraps over itself, making a coil.
● Holding your coil secure, slide it off of the quilling tool.
● Allow the coil to loosen up, making sure to keep it together. (To do this you can use your fingers)
Next:
Glue the “tail”, or end, of the strip to the coil. (Hold it down for 10-20 seconds to make sure it stays!)
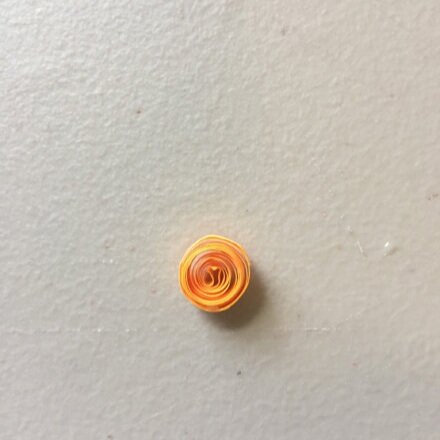
Now, you have a finished coil!
Next: Make a bunch of coils and practice shaping them into hearts, teardrops, and eyes after you have glued down the tails.
To Make Shapes:
1. Take your coil and hold it with your index fingers and thumb.
2. Squeeze the coil to make different shapes. (The way you squeeze it changes your shape, so play around with a few to get the hang of it.)
3. Examples:
a. The Eye Shape can be made by squeezing both sides of your coil and pushing towards the center.
b. The Teardrop Shape can be made by squeezing just one side of your coil.
c. The Gumdrop Shape can be made by squeezing one side gently, while pushing your coil against your other index finger.
d. The Slug Shape can be made by making an eye shape, then pushing each end in a different direction.
4. Make a bunch of different shaped coils. Don’t worry about the big picture yet, just play around with shapes and sizes.
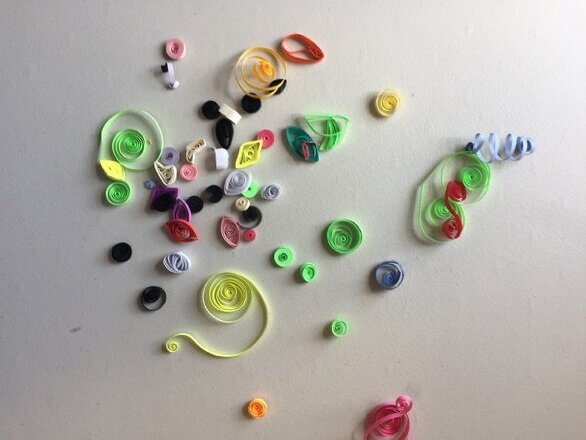
Finally, choose some coils and compose a picture.
-
Once you have made your different coils, you are ready to arrange them.
-
Before gluing anything down, try arranging your coils in different ways until you know what you want.
-
Use a toothpick to spread glue on one side of your coil (you only need a little bit) then glue it down!
-
Make sure all the glue has dried, and you are finished. Congratulations! You’ve learned how to quill!
We hope that you have enjoyed quilling and creating a work of art! Share it with us at historicdeerfield@historic-deerfield.org!